Auto-filling data in the e-mail subject
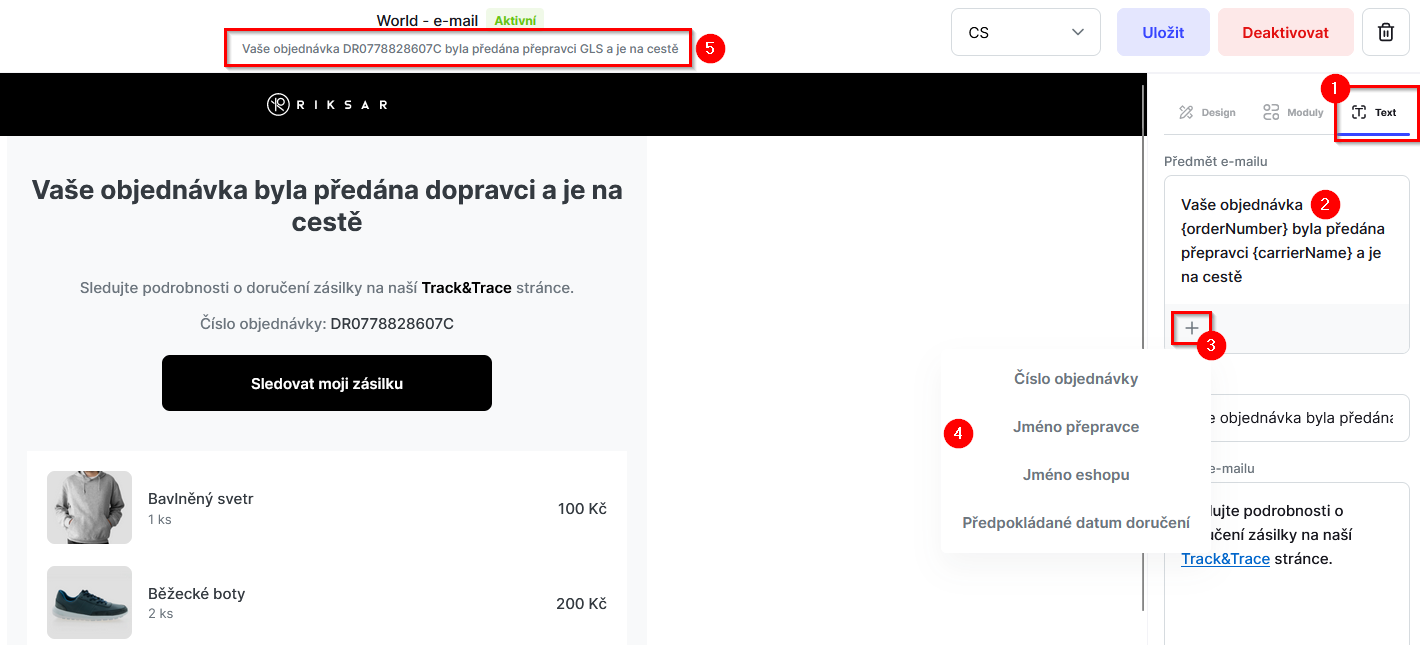
Set up your e-mail templates so that customers see important information about their shipment right in the e-mail subject, as shown in the image.

You can currently include these parameters in the e-mail subject:
- order number = {orderNumber}
- e-shop name = {eshopName}
- carrier name = {carrierName}
- estimated delivery date = {estimatedDeliveryDate}
This data is always filled in automatically in the selected e-mails, according to the status of the order.
Where and how do I add parameters to the subject?
- You add the parameters in the e-mail templates under Communication -> Mailing on the Text tab.
- In the E-mail subject field, click where you want to insert the parameter.
- Use the “+” button at the bottom of the field to pick the option you want.
- The selected parameter then appears in the subject field in curly brackets, e.g. {carrierName}.
- You can check the text in the top bar above the e-mail template.
Once you have set the subject and any other fields of the e-mail, click Save.
❗Remember to check the spaces before and after the inserted parameter so that it doesn't run into the adjacent word in the subject.
💡You can edit the other fields of the e-mail template the same way; they offer more options, including text formatting. Find out more in the article Text settings in e-mail templates.
Still have questions?
Contact usMore articles in this category
- Billing address in e-mails by delivery method
- Campaigns – a banner in e-mails and on the Track & Trace page
- Duplicating templates, campaigns and workflows
- E-mails and SMS in the order timeline
- Emoji in the e-mail, Track & Trace and SMS editors
- Fallback SMS when an e-mail doesn't arrive
- Orders in the Seznam Email order overview
- Preview text of delivery e-mails
- Sending e-mails from your own domain (DKIM verification)
- SMS statistics
- SMS to customers
- Withdrawal from contract – button in delivery e-mails
- Recommended products
- UTM parameters in links
- Payment details in the order summary
- Attachments in e-mails
- Customer PIN code in the e-mail
- Info banner
Articles in this category
- Billing address in e-mails by delivery method
- Campaigns – a banner in e-mails and on the Track & Trace page
- Duplicating templates, campaigns and workflows
- E-mails and SMS in the order timeline
- Emoji in the e-mail, Track & Trace and SMS editors
- Fallback SMS when an e-mail doesn't arrive
- Orders in the Seznam Email order overview
- Preview text of delivery e-mails
- Sending e-mails from your own domain (DKIM verification)
- SMS statistics
- SMS to customers
- Withdrawal from contract – button in delivery e-mails
- Recommended products
- UTM parameters in links
- Payment details in the order summary
- Attachments in e-mails
- Customer PIN code in the e-mail
- Info banner